After the Tiki admin has set the basic directory configuration (see DirectorySettings ), go to the Application Menu and select Admin directory from the Directory menu item. This will open the Directory Administration page.

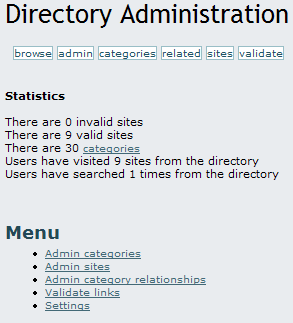
Buttons at the top and a menu at the bottom allow you to:
- Browse the directory
- Admin the entire directory
- Admin categories
- Admin related categories
- Admin sites (add, delete or edit them)
- Validate links users have suggested
- Go to the Tiki admin's settings page (if permitted)
As is evident from this screen shot, Tiki compiles several directory-oriented statistics:
- Invalid/valid sites
- Sites that have been validated (or not) by admins.
- Number of categories
- These are the sub-categories specific to the directory and are not the same as Tiki categories (see Category).
- This stat contains a link to the Admin directory categories page.
- Number of times users clicked through from your site to one of the links.
- Numer of times users have searched the directory
Let's look at these admin functions one at a time.
Managing categories
Clicking on categories will take you to the categories administration screen, which displays a Parent category (a drop-down list), a form to add new categories, and a list of sub-categories under the current parent category.

Note that categories are arranged as parents and children--much like a family tree. Over all the child categories is the Top category, which is displayed in the drop-down menu of this screen shot. You can create subcategories for the Top category or any other category by first selecting the category as the Parent category in this drop-down menu. Then, use the Add a directory category form to build new child categories beneath this parent.

The options are:
| Name | Category name |
| Description | Category description |
| Children Type | When browsing the category tree a line of text will be displayed below the category name. You can choose what goes in this line: the most-visited sub-categories, the category description, or random sub-categories. |
| Maximum number of children to show | Once you decided what will be displayed below the category you can set up how many items will be displayed. You can choose none to eliminate the line below the category name. Note that if you decide to show the category description this option has no effect. |
| Allow sites in this category | Whether sites can be added to this category or not. You might prohibit sites in a category if you only want to use it to contain other sub-categories. |
| Show number of sites in this category | If enabled the number of sites in the category will be displayed next to the category name. |
| Editor group | You can indicate a Tiki group that will have admin permission for this category. These editors will be able to validate sites. |
| categorize | In addition to the categories of the directory, Tiki also uses global categories that apply to all objects within it. This option allows you to put your directory category within a Tiki category. To do so, first click show categories to see which Tiki categories are available (as has already been done in this screen shot). Select the appropriate categories and check categorize this object. See Category for more information on Tiki categories. |
At the bottom of the Admin directory categories page is a list of directory sub-categories for the parent category indicated by the drop-down menu at the top of the page.

Its columns indicate how a sub-category was configured with the Add a directory category form:
| name | In this example, four names are shown. |
| cType | Children type (d = description in this example). |
| view | Maximum number of children to show. |
| allow | Allow sites in this category. |
| count | Show number of sites in this category (number of sites in parenthesis). |
| editor | Editor group. In this example, a group named editor has been used. |
| action | Buttons to relate, edit, and delete categories, respectively. |
Related categories
In addition to being connected much like parent to child, categories can also be directly related to one another--like cousins in a new generation.
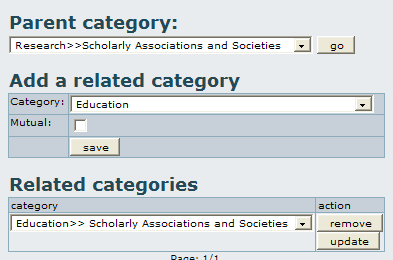
Clicking on related will take you to the Admin related categories screen, which displays a Parent category (a drop-down list), a form to add related categories, and a list of related categories that connect to the current parent category.

In order to establish a relationship between two categories:
- Select a first, parent category from the Parent category drop-down list.
- E.g., Research>>>Scholarly Associations and Societies
- Select the to-be-related category from the Add a related category drop-down list.
- Check mutual if the relationship goes both ways (A=>B, B=>A). If mutual, then whenever either category is displayed, the connection to the other category will also be displayed.
- The save button will add the relationship.
Under Related categories, you will see a drop-down list of the categories that are related to the selected parent category. You can update and remove relationships from here.
Admin sites
Clicking on sites will take you to the Admin sites screen.

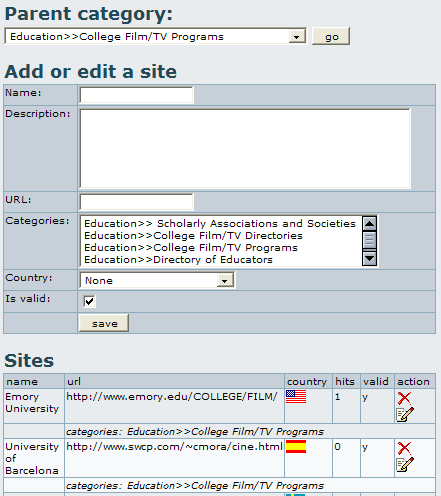
The Parent category drop-down menu allows you to view sites in any single category or to view all sites in all categories. This choice determines what will appear in the Sites section of the screen, which indicates how sites will display in the directory.
![]() Click the edit icon to load that site into the Add or edit a site form, or enter data for a new site. The options are self-explanatory, but note that when adding a site to a category you can also put the site in many other categories. Just control-click all the categories you wish to use and you won't have to enter the same information over and over.
Click the edit icon to load that site into the Add or edit a site form, or enter data for a new site. The options are self-explanatory, but note that when adding a site to a category you can also put the site in many other categories. Just control-click all the categories you wish to use and you won't have to enter the same information over and over.
Site Validation
Clicking on validate will take you to the Validate sites screen, where you may approve or reject user-suggested sites.

To validate one or several sites, check the appropriate box(es) and click the validate button. A similar technique will do mass removals. Click the edit icon ![]() to edit a site or the delete icon to remove one.
to edit a site or the delete icon to remove one.
DirectoryDoc
DirectorySettings
DirectoryDev