REDIRECT:Communications Center
The communications center can be used to send/receive objects from Tiki, for example Wiki pages and articles.
In order to use the communications center the feature must be enabled from the admin screen.
If you enable the communications center you will see a link to send pages from the wiki menu and a link to received pages from the wiki menu (if you have the right permissions).
Sending objects
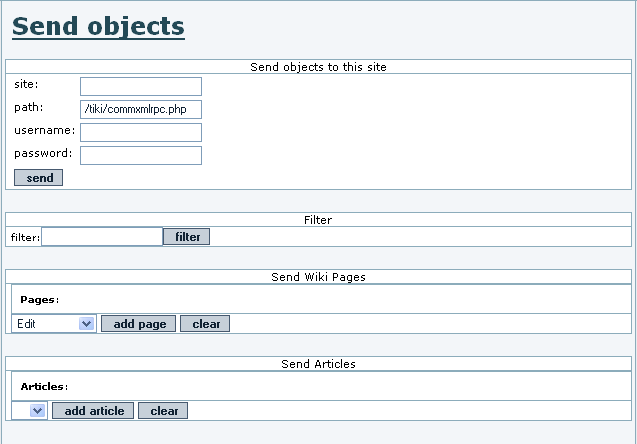
Once enabled, there should be a link in the application menu Wiki>Send Objects. The screen looks like this:

Clicking the send link from the application menu displays the screen where you can send Tiki objects to other sites. The first part of the screen must be filled after you selected all the objects to send, the second part can be used to select the Wiki pages that will be sent to another site, select pages (as many as you want) clicking the add page link. When you have selected all the pages to send fill the information at the top as follows:
- Site
- The URL for the site, for example: www.foo.com (Don't use http://....)
- Path
- The path to the commxmlrpc.php script for the site, a typical value is /tiki/commxmlrpc.php, but if the installation is different it can be another path, sites should inform the path to the commxmlrpc.php script. This is added to the end of the Site value to build the URL for accessing the commxmlrpc program.
- Username
- The username that will be used to send objects to the site (it must be a valid username for the destination site and the user must have the permission to send objects. In other words the destination site must have a user with his name and configure permission to send objects for that user)
- Password
- The password for the username.
If everything goes well you will see a message describing the result of the operation.
How to test if this is working.
From the admin screen make sure that you have the communications feature enabled, then use the following information to send an object to yourself:
- Site: localhost
- Path: /tiki/commxmlrpc.php (change it you installed Tiki in other directory)
- User: admin
- Password: admin
The communication should be performed and you are ready to examine the received pages.
Administering received Wiki pages
From the Wiki section in the application menu click the received pages link. The following screen will be displayed:
In this screen you can see the list of pages received, the date when the page was received, the site that sent the page, and the user used from the sending site to send the page.
If the name of the page is in red then the page has the same name as an existing page in your system and so you have to rename the page before being able to accept it.
For each page you can remove it (if you don t want it), edit the page (where you can rename it), view the page or accept it.
Once accepted the page will be part of your Wiki as a normal Wiki page.
Administering other received objects
The procedure to admin other received objects is similar to the procedure described to manage received pages, you will see listing of the received objects and you will be able to edit them, remove them or accept them as objects in your Tiki site. Once accepted you will be able to manipulate the objects as normal Tiki objects.
Permissions
The following permissions can be used to control the communications
If you want to configure a user that other sites can use to send objects to your site put the user in a group with the tiki_p_sendme_pages, tiki_p_sendme_articles or similar permission.